Damp Walls? I'm confused.com

tvrulesme

New Member
I've had a full damp and timber survey done, watched hundreds of hours of youtube damp videos, spoken with a tonne of different trades and the only thing I am sure of is that everyone has a different opinion. Thought I would ask on here as I have had excellent responses to another question.

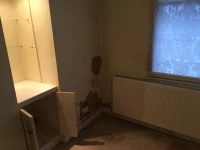
What is the most likely cause of damp in this picture? What steps would you take to resolve it?

IMG_1203.PNG


The facts:
  • The house was built in 1810, is a listed building and has no DPC
  • This is an internal wall, behind this wall is a bathroom which has a floor level about 8cm higher than the floor level in this room
  • The floor would have originally been clay tiles, has since had a concrete slab laid
  • The area in the photo was behind some kitchen units, the oak floor had buckled considerably
  • The slab appears relatively dry, not damp to the touch
  • The house is of solid wall construction without a cavity
  • The room has been plastered at some point over the last 20 years with gypsum and painted with what appears to be a damp seal paint
 
I've had a full damp and timber survey done, watched hundreds of hours of youtube damp videos, spoken with a tonne of different trades and the only thing I am sure of is that everyone has a different opinion. Thought I would ask on here as I have had excellent responses to another question.

What is the most likely cause of damp in this picture? What steps would you take to resolve it?

View attachment 67424


The facts:
  • The house was built in 1810, is a listed building and has no DPC
  • This is an internal wall, behind this wall is a bathroom which has a floor level about 8cm higher than the floor level in this room
  • The floor would have originally been clay tiles, has since had a concrete slab laid
  • The area in the photo was behind some kitchen units, the oak floor had buckled considerably
  • The slab appears relatively dry, not damp to the touch
  • The house is of solid wall construction without a cavity
  • The room has been plastered at some point over the last 20 years with gypsum and painted with what appears to be a damp seal paint
What does it mean when your copper pipes turn blue?
The most common copper color changes are blue, green and black. Blue or Bluish-Green – Blue or bluish green coloring can indicate corrosion. If the water appears blue or bluish-green when it comes out of the taps, the corrosion is likely inside the water pipe. If you notice the exterior of the pipe turning colors, you have a pinhole leak.
 
I've had a full damp and timber survey done, watched hundreds of hours of youtube damp videos, spoken with a tonne of different trades and the only thing I am sure of is that everyone has a different opinion. Thought I would ask on here as I have had excellent responses to another question.

What is the most likely cause of damp in this picture? What steps would you take to resolve it?

View attachment 67424


The facts:
  • The house was built in 1810, is a listed building and has no DPC
  • This is an internal wall, behind this wall is a bathroom which has a floor level about 8cm higher than the floor level in this room
  • The floor would have originally been clay tiles, has since had a concrete slab laid
  • The area in the photo was behind some kitchen units, the oak floor had buckled considerably
  • The slab appears relatively dry, not damp to the touch
  • The house is of solid wall construction without a cavity
  • The room has been plastered at some point over the last 20 years with gypsum and painted with what appears to be a damp seal paint
Dig the floor up hack the plaster off change the pipe work.
Plaster in 3 coat lime
Lime screed the floor
Paint in breathable paint
Have a holiday
 
Dig the floor up hack the plaster off change the pipe work.
Plaster in 3 coat lime
Lime screed the floor
Paint in breathable paint
Have a holiday
Definitely leaning towards this despite our earlier discussion on Limecrete...

I'm thinking that as I shouldn't be doing lime work until spring, would be better to hack it all off now and let it dry out until spring time. Does that sound sensible?
 
What does it mean when your copper pipes turn blue?
The most common copper color changes are blue, green and black. Blue or Bluish-Green – Blue or bluish green coloring can indicate corrosion. If the water appears blue or bluish-green when it comes out of the taps, the corrosion is likely inside the water pipe. If you notice the exterior of the pipe turning colors, you have a pinhole leak.
Super interesting thank you. I'm noticing basically all the pipes in this room are blue or bluish-green. Even the gas pipe see below. Have not noticed the water being blueish though

IMG_1116.jpg
 
What does it mean when your copper pipes turn blue?
The most common copper color changes are blue, green and black. Blue or Bluish-Green – Blue or bluish green coloring can indicate corrosion. If the water appears blue or bluish-green when it comes out of the taps, the corrosion is likely inside the water pipe. If you notice the exterior of the pipe turning colors, you have a pinhole leak.
That's bostik plasterers grit on them pipes
 
I've had a full damp and timber survey done, watched hundreds of hours of youtube damp videos, spoken with a tonne of different trades and the only thing I am sure of is that everyone has a different opinion. Thought I would ask on here as I have had excellent responses to another question.

What is the most likely cause of damp in this picture? What steps would you take to resolve it?

View attachment 67424


The facts:
  • The house was built in 1810, is a listed building and has no DPC
  • This is an internal wall, behind this wall is a bathroom which has a floor level about 8cm higher than the floor level in this room
  • The floor would have originally been clay tiles, has since had a concrete slab laid
  • The area in the photo was behind some kitchen units, the oak floor had buckled considerably
  • The slab appears relatively dry, not damp to the touch
  • The house is of solid wall construction without a cavity
  • The room has been plastered at some point over the last 20 years with gypsum and painted with what appears to be a damp seal paint

I appreciate that you need to sort possible sources of damp, but you do realise that fungus will need treating ASAP, too, don't you?

Should be hacked off back to brick, at least a metre (preferably 2metres) past the limit of the visible fungus, in all directions, then sprayed with commercial grade anti-fungal (wear FULL PPE to avoid skin contact, inhalation, and eye contact. No stupid DIY paper masks - something proper, like a 3M 4251 etc.). Or get someone in to do it for you.

Lignum Pro D156 1L is suitable, and there are other equivalents on the market.

Dry rot needs to be taken seriously or it will continue to cause damage to a property.

Others will likely disagree with what I've just said, but such is life :aburrido:
 
Last edited:
I appreciate that you need to sort possible sources of damp, but you do realise that fungus will need treating ASAP, too, don't you?

Should be hacked off back to brick, at least a metre (preferably 2metres) past the limit of the visible fungus, in all directions, then sprayed with commercial grade anti-fungal (wear FULL PPE to avoid skin contact, inhalation, and eye contact. No stupid DIY paper masks - something proper, like a 3M 4251 etc.). Or get someone in to do it for you.

Lignum Pro D156 1L is suitable, and there are other equivalents on the market.


Others will likely disagree with what I've just said, but such is life :aburrido:
So preoccupied with the damp I didn't even think of this. I have some proper asbestos proof masks so sorted for that. Just out of interest, why would they disagree?
 
I've had a full damp and timber survey done, watched hundreds of hours of youtube damp videos, spoken with a tonne of different trades and the only thing I am sure of is that everyone has a different opinion. Thought I would ask on here as I have had excellent responses to another question.

What is the most likely cause of damp in this picture? What steps would you take to resolve it?

View attachment 67424


The facts:
  • The house was built in 1810, is a listed building and has no DPC
  • This is an internal wall, behind this wall is a bathroom which has a floor level about 8cm higher than the floor level in this room
  • The floor would have originally been clay tiles, has since had a concrete slab laid
  • The area in the photo was behind some kitchen units, the oak floor had buckled considerably
  • The slab appears relatively dry, not damp to the touch
  • The house is of solid wall construction without a cavity
  • The room has been plastered at some point over the last 20 years with gypsum and painted with what appears to be a damp seal paint
Think hundreds of hours of you tube videos is bit of a exaggeration
 
Think hundreds of hours of you tube videos is bit of a exaggeration
Maybe maybe not. House took nearly a year to buy, damp survey was at the beginning, a lot of lockdown hours on my hands..... From one person alone Peter Ward I have watched every single one of his and a load of others too
 
Definitely leaning towards this despite our earlier discussion on Limecrete...

I'm thinking that as I shouldn't be doing lime work until spring, would be better to hack it all off now and let it dry out until spring time. Does that sound sensible?
You will be ok with internal lime this time of year as long as it’s 5 + inside the property and the gear is also kept inside.
I would get a tradesman booked now as a lime guy is likely to be booked for a while then hack everything off and start the drying process and also give you more
time to deal with problems you have not found yet.
Could also have a damaged old drain run or is the water main any where nearby?
Get it all off and make a plan from there
 
All rots are due to a moisture laden atmosphere. The mycelium present is the fungus looking for more food, usually a carbon, most usually wood. The spores for rot are in our atmosphere continually, swirling around on the winds. When they make contact with a suitable environment they flourish. The answer is to have less moisture present. Fungicides help in the 1st instance, but long term, a dryer atmosphere is key. Another post on here suggests correctly that mycelium should be exposed, and that the material it lives on be stripped for at least 1m past it’s last point of observation. Be aware that some mycelium’s can penetrate brick fissures, so that’s where the fungicide comes in. Stripping can go on a bit. Good luck.
 
All rots are due to a moisture laden atmosphere. The mycelium present is the fungus looking for more food, usually a carbon, most usually wood. The spores for rot are in our atmosphere continually, swirling around on the winds. When they make contact with a suitable environment they flourish. The answer is to have less moisture present. Fungicides help in the 1st instance, but long term, a dryer atmosphere is key. Another post on here suggests correctly that mycelium should be exposed, and that the material it lives on be stripped for at least 1m past it’s last point of observation. Be aware that some mycelium’s can penetrate brick fissures, so that’s where the fungicide comes in. Stripping can go on a bit. Good luck.
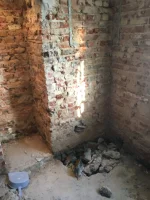
Thanks a lot. Luckily (or unluckily) for me the whole of the plaster is going to be ripped off all the way to the ceiling and taken back to brick before re-plastering with lime. Bought some Lignum Pro D156 as recommended by @MakeItSmooth and I'll get those pipes redone. Looks stupid coming out of one wall and back in to another anyway.

The other walls not nearly as bad fortunately, even this external wall where the mains water comes in. The damp floor was from where I removed the taps, not always damp

IMG_1206.PNG
 
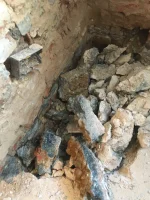
This weeks work digging up a soaking wet slab!
 

Attachments

  • 188A32A5-A5F2-4841-A586-7C2CFB83808E.jpeg
    188A32A5-A5F2-4841-A586-7C2CFB83808E.jpeg
    1.6 MB · Views: 180
  • 30952ECB-64C7-4ADD-BA83-26DAE277F7B8.jpeg
    30952ECB-64C7-4ADD-BA83-26DAE277F7B8.jpeg
    1.5 MB · Views: 182
  • 1CC94701-03F9-4087-81FA-DC67F77978F6.jpeg
    1CC94701-03F9-4087-81FA-DC67F77978F6.jpeg
    1.9 MB · Views: 193
Top