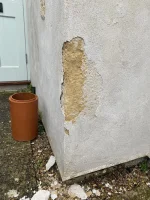
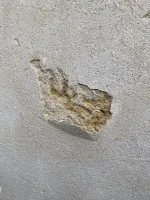
2.5 years old lime render crumbling away... advice appreciated

AKerby

New Member
Hello,
We had our house completely re-plastered in May 2018 as the existing was a non permeable render and had resulted in damp.
Our quote was specified as follows;

  • Apply 1st Haired dubbing coat to cob wall allow 48hrs to cure protecting with hessian sheeting.(depending on drying times)
  • Apply second medium coat again allow to cure. (48hrs depending on drying times)
  • Apply top coat, wooden float finish retaining features above any windows.
We also had extensive internal damp proofing works carried out by a different company which were exemplary.
Now nearly 3 years on the external render is in a terrible state.
We first noticed small patches coming loose approx 1 year later (contacted plasterer, he said he’d sort but never did). This has steadily got much worse. It also appears as if it has never completely dried out.
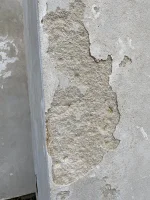
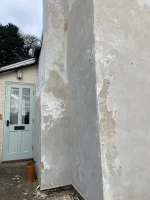
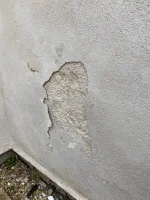
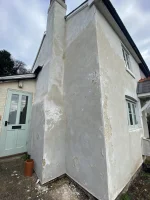
I have taken photos of the main offending areas, which the plasterer is now blaming on recent bad frosts (it has become much worse since the frosts but was still ongoing so not entirely to blame). There are other areas where if you tap then it sounds hollow.
I would really appreciate a second opinion on what the cause might be so we can source someone more reliable to put it right.
(In Hampshire)
Thank you in advance
CC62CDCB-5AAF-4338-B740-4412487EFFF0.jpeg
 

Attachments

  • E7330FCA-735E-4D1F-B329-3E824230DAF4.jpeg
    E7330FCA-735E-4D1F-B329-3E824230DAF4.jpeg
    4.1 MB · Views: 1,307
  • 4334C887-1D8C-4F47-A8BD-3552BB893003.jpeg
    4334C887-1D8C-4F47-A8BD-3552BB893003.jpeg
    2.6 MB · Views: 427
  • A9228E0F-DC88-4AF1-B26A-F0B6A0BCDE9C.jpeg
    A9228E0F-DC88-4AF1-B26A-F0B6A0BCDE9C.jpeg
    4.4 MB · Views: 593
  • B572F65F-10C9-41AA-B7C1-AF5EBA66A0CB.jpeg
    B572F65F-10C9-41AA-B7C1-AF5EBA66A0CB.jpeg
    1.8 MB · Views: 669
  • A30A024E-6AE0-4585-9FEC-FFE758B44379.jpeg
    A30A024E-6AE0-4585-9FEC-FFE758B44379.jpeg
    3.8 MB · Views: 429
  • BA187BD5-F7AE-4D4A-971B-98A3950C483C.jpeg
    BA187BD5-F7AE-4D4A-971B-98A3950C483C.jpeg
    5.3 MB · Views: 413
I should mention that the corner of the house where the majority of the damage is faces south-east and does bear the brunt of wind and rain
 
Was it rendered with putty lime or hydraulic ?
If he’s used putty lime mortar it looks like there is no pozzy in the mortar.
 
Hello,
We had our house completely re-plastered in May 2018 as the existing was a non permeable render and had resulted in damp.
Our quote was specified as follows;

  • Apply 1st Haired dubbing coat to cob wall allow 48hrs to cure protecting with hessian sheeting.(depending on drying times)
  • Apply second medium coat again allow to cure. (48hrs depending on drying times)
  • Apply top coat, wooden float finish retaining features above any windows.
We also had extensive internal damp proofing works carried out by a different company which were exemplary.
Now nearly 3 years on the external render is in a terrible state.
We first noticed small patches coming loose approx 1 year later (contacted plasterer, he said he’d sort but never did). This has steadily got much worse. It also appears as if it has never completely dried out.
I have taken photos of the main offending areas, which the plasterer is now blaming on recent bad frosts (it has become much worse since the frosts but was still ongoing so not entirely to blame). There are other areas where if you tap then it sounds hollow.
I would really appreciate a second opinion on what the cause might be so we can source someone more reliable to put it right.
(In Hampshire)
Thank you in advanceView attachment 59289
For that to be rendered over cob looks like he’s skimmed over the top of it lol. on cob that would need a had skat coat and cure/dry, then a bug out coat dry and cure then a scratch coat with hair or mesh to dry/cure then a float coat looks way too thin for the amount of applications it would need
 
For that to be rendered over cob looks like he’s skimmed over the top of it lol. on cob that would need a had skat coat and cure/dry, then a bug out coat dry and cure then a scratch coat with hair or mesh to dry/cure then a float coat looks way too thin for the amount of applications it would need
Hi Ritch,
Thanks for your reply. I have to admit I don't understand all of what you have said (as I'm not a plasterer!) but I was confused about the mention of cob in the original quote because the walls are made of red brick so not sure whether the cob layer was something he added or a mistake from editing a previous quote!
 
Finish is awful for a start, definately frost damage has added to the issues but could either be not mixed right in the right ratio in the first place or wasnt sprayed with water enough when each new coat was applied so it hasnt adhered properly, also explains the hollow sound
 
Did this guy mix his own stuff base layers look very Sandy looks like he may of switched between nhl and a putty would never recommend to mix the two. Also 48 hours is no where near enough time between coats always around a week.
What plaster is on in the inside as also needs to be lime?
 
Finish is awful for a start, definately frost damage has added to the issues but could either be not mixed right in the right ratio in the first place or wasnt sprayed with water enough when each new coat was applied so it hasnt adhered properly, also explains the hollow sound
Thank you for your comments Devon lime specialist
 
Did this guy mix his own stuff base layers look very Sandy looks like he may of switched between nhl and a putty would never recommend to mix the two. Also 48 hours is no where near enough time between coats always around a week.
What plaster is on in the inside as also needs to be lime?
I think he mixed his own, but couldn't be 100% sure as we were out at work mostly when it was being done.
The plaster on the inside I believe is a lime plaster but a much smoother, did a brilliant job (different person).
 
For that to be rendered over cob looks like he’s skimmed over the top of it lol. on cob that would need a had skat coat and cure/dry, then a bug out coat dry and cure then a scratch coat with hair or mesh to dry/cure then a float coat looks way too thin for the amount of applications it would need
I'm sure that's cleared things right up for him
 
Did he take the old render off? Definitely not left long enough between coats (if he did take old render off), he has also used render stops to get the drip at the bottom, are they stainless steel?
 
Hello,
We had our house completely re-plastered in May 2018 as the existing was a non permeable render and had resulted in damp.
Our quote was specified as follows;

  • Apply 1st Haired dubbing coat to cob wall allow 48hrs to cure protecting with hessian sheeting.(depending on drying times)
  • Apply second medium coat again allow to cure. (48hrs depending on drying times)
  • Apply top coat, wooden float finish retaining features above any windows.
We also had extensive internal damp proofing works carried out by a different company which were exemplary.
Now nearly 3 years on the external render is in a terrible state.
We first noticed small patches coming loose approx 1 year later (contacted plasterer, he said he’d sort but never did). This has steadily got much worse. It also appears as if it has never completely dried out.
I have taken photos of the main offending areas, which the plasterer is now blaming on recent bad frosts (it has become much worse since the frosts but was still ongoing so not entirely to blame). There are other areas where if you tap then it sounds hollow.
I would really appreciate a second opinion on what the cause might be so we can source someone more reliable to put it right.
(In Hampshire)
Thank you in advanceView attachment 59289
to thin a coat and dried out to fast at a glance
 
Thanks for your replies.
The plasterer came out today to 'measure up' for repairs. His appraisal was that it is weather damage and that we should've had it painted when it was done (despite him telling us it was only cosmetic at the time and there was no need).
 
Top