ChrispyUK
Well-Known Member
stick with it…it’s fine. It takes time to break a new trowel in and bigger doesn’t equal better when you’re a beginner.Brace yourself - A Wickes basic trowel

stick with it…it’s fine. It takes time to break a new trowel in and bigger doesn’t equal better when you’re a beginner.Brace yourself - A Wickes basic trowel
Ah man that sounds rough! Can't imagine the pain of that. Every story I read said the same about the hospital treatment. My mate said it's the lime that is the big cause? Bonding must have no or little lime in it as I had no issues after washing out with water. Or I got lucky.Happened to me a couple of times and it ain’t nice tbh. The worst time was when I completely flooded my eye with plaster, so went to A and E as just round the corner. I think the clean up and the plastic gizmo they put in your eye is worse than the feeling of the plaster tbf. Most of the time if I cut or bash myself, I just carry on as I’ve got a high pain threshold, but felt sick as a dog with this. I left the van on the job and my work mate drive me to my mates and got smashed. Woke up feeling fine.
Just don’t overload your trowel and be directly underneath. Nice steady progress. You only have to move whatever your standing on a few inches to be in a better position and a bit more protected.
Reg bonding, put on a few pissy coats of pva. It’ll soak in better rather than a thick mix which will just skin over on the top, and you’ll know when it’s ok as it’ll stop drinking it and take longer to dry off. Pva those boards as well as old PB can suck like mad if you’re not careful. You can use it to your advantage sometimes, a bit like skimming over hardwall the next day, but not in your case. Looking at what you’ve done, I would mix up a thin/wet coat of bonding after pvaing, and give it a further flattening as it looks a bit rough in places tbh.
You can just level out areas with finish and not use bonding if it’s not too bad. If you’re on your second mix in one section and moving to another after, then use up leftovers to dub out low spots and beads but don’t over stretch yourself. You can always do a little mix to fix the shitty bits before continuing with your 2 coats.
Ah man that sounds rough! Can't imagine the pain of that. Every story I read said the same about the hospital treatment. My mate said it's the lime that is the big cause? Bonding must have no or little lime in it as I had no issues after washing out with water. Or I got lucky.
I did get a bad concrete burn on my legs in the past. Got in the wellies and the friction caused it. No time to stop of course but nothing like the eye I'm sure.
Sound advice. It was the smallest area I have plastered so far but also the hardest. Lots of angles and the first time I have plastered above my head. Also first time not on plain plasterboard, I did feel the gear going off faster than before. Good news is that was the least plaster I have dropped so far so I am getting better at the process.
Nice one, I will take your advice and watered down PVA everything. Fair comment and I completely agree. I will use my straight edge again and see where I am at then flatten it more with a weak coat.
So far I have only plastered 1 section/wall at a time, it takes all my focus to do one following all steps. I am not skilled or quick enough to do 2 yet. I used the bonding to try and help make the plastering easier. Like for the tappered edge joint I have bonded flat so I don't need to think about filling when plastering. Bonding the window reveals was a good move as I didn't have to fill any low points.
")
Just learn by it mate, think your over thinking it and trying too hard there !Today I went for it and it was a complete disaster.
Used the half time stuff and found it was too slow. I think I would have better better off without it on this section.
Got the first coat on and then used the speed scim and it was pulling off areas. I think my wall wasn't flat and these were high points maybe?
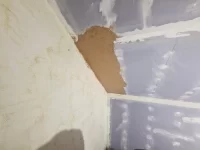
There is also 1 tennis ball size area where the plaster has almost popped out. If I were guessing it seems like it's failed to bond to the wall. I kept flattening it and it kept expanding out. Could always cut this out and fill.
I worked my ass off and could not for the life of me get a flat finish on this wall. It's all over the place. Will have to spend a lot of time sanding and filling. When I say bad I mean real bad. Better than my first attempt as I got 2 coats on but my other 4 walls come out so much better than this.
Just learn by it mate, think your over thinking it and trying too hard there !
Try and not give as much of a f**k and it will probably come out great !
Release your sockets it’s good work practice.Today I went for it and it was a complete disaster.
Used the half time stuff and found it was too slow. I think I would have better better off without it on this section.
Got the first coat on and then used the speed scim and it was pulling off areas. I think my wall wasn't flat and these were high points maybe?
There is also 1 tennis ball size area where the plaster has almost popped out. If I were guessing it seems like it's failed to bond to the wall. I kept flattening it and it kept expanding out. Could always cut this out and fill.
I worked my ass off and could not for the life of me get a flat finish on this wall. It's all over the place. Will have to spend a lot of time sanding and filling. When I say bad I mean real bad. Better than my first attempt as I got 2 coats on but my other 4 walls come out so much better than this.
 My thinking is to sand and fill to get it as flat as possible. Learn from it and move onto the next wall. It is better than my first attempt as I at least got 2 coats on and there are sections of smooth/flat.
That’s the least of his problems …Release your sockets it’s good work practice.
That’s the least of his problems …
Every one needs to Stop cheer leading
Op @ just stop know @ best advice is work with a pro for free / or do a plastering course of sorts it will be highly beneficial if you like diy tasks …… plastering It is a highly skilled profession ..
Looks your running out of space regarding the door frame architraves going back on that mate, you could give it another coat and wait till it picks up and is ready to finish, you could then fit thin pine strips around the door to pack it out for the architraves. Or sand the f**k out of it, give it a mist coat and fill anything that's obvious with easy fill mate.Cheers for the support lads.
Went from a plastering high where every wall was getting better to a low with this sh*t attempt.
But there's a reason why plastering is avoided by most DIY guys. It's hard as f**k to do so fair play to you guys who make a living plastering.
I did have the socket released on the first attempt, tried it set this time to see the difference.
--------
What do you guys recommend for a wall full of dips and valleys?
Said "the gardener" !That’s the least of his problems …
Every one needs to Stop cheer leading
Op @ just stop know @ best advice is work with a pro for free / or do a plastering course of sorts it will be highly beneficial if you like diy tasks …… plastering It is a highly skilled profession ..

Also I learned web development by doing. No courses/training. I managed to build a business and buy a house from that knowledge.
As in you !!!!!!!!!!!!!!!!!!!!!!!!!!!!!!!!!!!Unfortunately .that process won’t happen with a skilled trade ….however good luck - @ some of the clowns on here, are not even plasters .
")
Web development is a very skilled job also. Way different to plastering but the same in the sense that it's not easy to pick up and takes a lot of time to get any good.Unfortunately .that process won’t happen with a skilled trade ….however good luck - @ some of the clowns on here, are not even plasters .
Looks your running out of space regarding the door frame architraves going back on that mate, you could give it another coat and wait till it picks up and is ready to finish, you could then fit thin pine strips around the door to pack it out for the architraves. Or sand the f**k out of it, give it a mist coat and fill anything that's obvious with easy fill mate.
Always, as Cockney stated, loosen the sockets. I duct tape them on the inside over the terminals to avoid the dreaded "BOOM" !
It's gonna take sanding and filling but that's the cost of learning. Will send a photo of the finished job but won't be able to continue with it until next week.
Spoken like a true cowboy ....That’s it, back on the horse

Great to be back
Quick question for you pros.
I've got a new stud wall and door frame. For some reason after plasterboard there is a good 5-7mm gap around the door frame. So the door frame of the stud wall is sticking out 5-7mm either side of the plasteboard. Maybe the guy who did it used the wrong size door frame? Maybe it's due to timber being smaller?
Either way what's recommended? Should I install the architrave flush with the door frame and fill the 5mm gap the other side with chalk? Or feather out the gap using bonding on the edge?
Can send photos tomorrow if needed
Common problem with chancers. A table saw would have sorted it.
It's a shame as a mate of mine I train with. He installed the stairs to the loft when no one else wanted to do it.
Rest of his work was really good but this was a fu*k up for sure.
What would you recommend? I'm thinking fit architrave and fill the gap with chalk is my best option. Will all be painted white so shouldn't be too noticeable.
Better off with a decent sander than a speed skim. I'm not taking the piss either.Thanks mate I will do that. Also picked up a speed skim today to give me a bit more of a fighting chance
Thanks that is what I will do.It’s a compromise where the arc isn’t sitting perfectly flat on the lining and caulking what’s left.
Before I re-did the loft room it was done with plasterboard filled and painted and it looked dreadfulBetter off with a decent sander than a speed skim. I'm not taking the piss either.
Even with my DIY plastering I will achieve a much better finish than that although it will also require some filling/sanding.