I'll probably get bashed for trying to help, but you did at least post your question in the DIY section of the forum, so here goes:
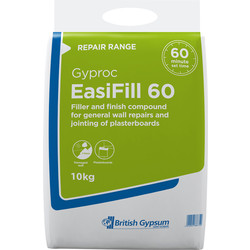
The economical way would be to buy a 10kg bag of Easi Fill
If you're looking to repair interior walls or fill plasterboard joints quickly and easily, you'll love this Gyproc Easifill 60 filler. It has a set time of just one hour, giving you a faster finish and helping you get more done.EasiFill 60 combines setting and air-drying, so can be used for both...

www.toolstation.com
Apply it with a plastering spatula (approximately 400mm-500mm. Putz, Refina, Nela, etc. are all decent brands. Cheapo brands tend to have uneven blades so they're a false economy), or a 10" taping knife from a DIY store, or a plastering trowel. A decent spat will only cost around £15.
There may be some shrinkage as the filler dries, so you'll need to compensate by applying a
slightly thicker layer than the desired end result. But do it
neatly, in long smooth strokes, or you'll cause unnecessary extra work for yourself (gnarly filler to sand flat). When you've finished applying all your filler, it should look 80+% as neat and smooth as you intend it to look after sanding!
Mix your filler in manageable amounts, or you'll find it goes off before you've finished applying it all.
When it's had at least 24 hours to thoroughly dry (depends how thick you put it on), you can sand it (don't use an orbital sander - use a long sanding block, so you bridge the peaks you're trying to hide. Yes, it's more work to sand manually but the problem with an electric sander is that it'll remove filler where you don't want it removed, unless you are a skilled user) - expect lots of fine dust everywhere, so use decorators dust sheets and wear a decent face mask. If you blow your nose and see loads of white dust in your snot, then your dust mask is not protecting you - sounds obvious, but you'd be amazed how many thousands of muppets can't grasp this simple concept. Don't use anything coarser than 120 or you'll start adding more lines to your ceiling. For the final sand, make sure you use P180 or finer. The dust will settle everywhere, but if you don't have professional sanding and extraction gear, then you don't have much choice.
When it's sanded, you can paint it with some diluted paint, and then continue with whatever paint was previously used on your ceiling (probably vinyl mat emulsion).
Don't expect miraculous results, but it should look significantly better than it did before, as long as you apply and sand taking care to bridge the unwanted peaks with the spat and the sanding block. If you ignore this and just fill it and sand it willy-nilly, then it'll look just as pants afterwards as it did before - perhaps even worse.


