Uber Newbie Needs Help!

Status
Not open for further replies.

pkme

New Member
Hello everyone--I am brand new here & brand new to plaster work, and I have a big question for you all:
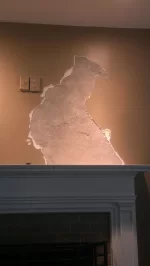
My husband & I bought a house that is about 80 years old last year. Most of the walls are plaster. About 6 months ago, due to a roof leak, the wall above the living room fireplace got water-damaged, and it bubbled up pretty badly. I have finally gotten around to *trying* to fix it, and I was given this advice: Tap & scrape the bubbled & loose plaster off. Remove as much of the dust as possible. Paint the area with KILZ primer to create a moisture barrier. Let dry. Apply Plaster of Paris. Dry & sand. Apply joint compound. Dry & sand. Paint. Done!
Well, as usually happens when I do any project, there was a surprise. Under the plaster is a very hard cement-like surface. I have attached 2 photos--I hope you can see them clearly. I had a close-up of the cement surface, but I could not get it to upload for whatever reason. There are tiny pebbles visible in it, and it is grey in color.
I think I have all of the loose & damaged plaster removed. We brushed and vacuumed as much dust off as possible. After doing this, I did an internet search to try to find out what the cement-like surface is and if I should omit the KILZ step. That is when I learned of asbestos cement millboard, and it has me a little freaked out, because we had plaster dust flying all over the place!
Can any of you tell by the photos what that surface is? If you think it is asbestos, what should I do??? If not, a big WHEW! --And then, should I skip the KILZ?
Thanks very much for your help.
~Clueless in Kentucky :huh:
 

Attachments

  • Uber Newbie Needs Help!
    zpfile001.webp
    67.5 KB · Views: 331
  • Uber Newbie Needs Help!
    zpfile000.webp
    55.4 KB · Views: 327
Well, that's good news then! Thanks very much for your reply. Do you think I should prime before replastering?
 
We do have a few American members on here that may be able to offer you better advice but for the life of me I can't think of any other than Kirk Giordano.
 
Many thanks to Danny for the excellent instructions on how to post this photo via photobucket. Now we'll see how well I followed those instructions...
I am trying to post a closeup of the cement-like material that was underneath the plaster. I hope it is clear enough to give you a good view of it.

Uber Newbie Needs Help!
 
Okay I'm familiar with this. From the picture I'd bet that the gray cement like plaster is "Hard Wall Plaster" or Duo purpose gypsum plaster mixed with sand. Usually applied over wood lath 80 yrs. ago. If you have removed all of the loose plaster and vacuumed off the dust, the next step I would take is to paint it with your Kilz, which is a stain blocking primer. When 80 yr. old hard wall is exposed to too much water it wants to break down, expand and turn into a powdery chalk, since you've removed that already the Kilz will put a barrier over that. After the kilz dries I would then paint over those areas with Larsons bonding agent if you need to use a thicker fill coat, let that dry. Depending on the thickness of the finish and if you have a texture in your finish might make a difference in the next material I would apply over the bonded/ or not bonded area. If it's kind of thin as in the picture I might use a couple coats of taping mud to fill the area, in which case I'd probably just go right over the primer and not use the Larsons. If there are some thicker fills I would pre fill those with Structolite Plaster. When mixing the structolite plaster you should mix in a small amount of agricultural gypsum or hydros calcium sulfate to initiate the structolite to setup. The Structolite can be scraped back flush with the edges of the patch after it has set, it is best to do that when it is still 'green'. After scraping back your patch you can then apply a couple coats of taping mud over your patches, a lot of times I'll use some woven fiber glass sheeting embedded into the first coat of taping mud to reinforce everything. let them dry and then sand smooth. If a texture is needed to match the existing walls I have to determine how to go about replicating it . For a sand finish I'll take a little taping mud mix it with a little concrete adhesive and add a very small amount of aggregate (sand) to the mix. Usually super fine grit does the job, mix it together and roll it over your patches with a 1/2 inch nap roller, back roll in different directions to match in to the existing sand finish texture. To imitate multiple layers of paint over your texture I'll let the rolled on texture dry and then I'll take watered down taping mud and apply a thin layer over the patches with a large sponge and then come back the next day and hit it again with only a moistened sponge. If you have some of the various other textures on your wall there's so many that I'd have to write you a book on how to replicate them. Good luck.
 
Just a thought I see a lot of water damage in the areas adjacent to fireplaces. Hopefully you have fixed the water intrusion problem. Was there a new roof on your house when you bought it? A lot of times improperly applied or age degraded flashings on your chimney will allow moisture intrusion.
 
Thank you very much, Loren! I appreciate all that information. The surface does actually look like sand mixed into plaster. It is very hard but small bits crumble off when you brush it.
There are no deep areas to repair. All of it is approximately 1/4" deep, as you see in the photos.
The walls are smooth, so no need to match texture--just a test of my ability to get a smooth finish!
I have worked on it tonight & will put another coat or two on tomorrow. I'll let you all know how it turns out.

As for the water damage, the only damage we saw/see was the bubbled plaster, which I had removed prior to taking the photos. The rest of the walls & fireplace surround appear to be in good shape. I wonder if it's a shadow you're seeing?
And, you are correct--the water damage occurred after a new roof was put on w/improperly installed flashing. :RpS_cursing:

Again, thank you all, especially Loren, for your time & great advice!
~PK
 
I probably should have mentioned that using a hot mud like beadex 20 or 40 might have helped with a fill of 1/4 of an inch but regular taping compound should suffice just make sure that you allow enough time for the mud to dry between coats. And I'm glad I could help.
 
Status
Not open for further replies.
Back
Top