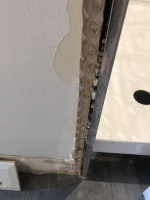
Shower edge help!!

Members online

Jonowebster

New Member
Hi Guys!

brand new here, absolute novice DIYer.....

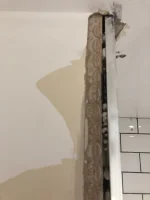
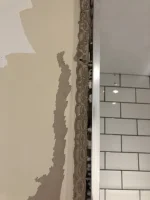
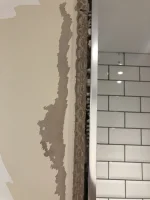
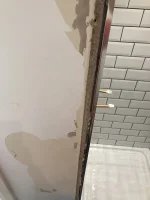
just having a en suite done and need some advice on how to fill or what to use to fix the gaps in the pics.

many help would be most welcome!
Thanks

jon
 

Attachments

  • 47C4D74F-7295-434E-9A80-4909B5571683.jpeg
    47C4D74F-7295-434E-9A80-4909B5571683.jpeg
    1.2 MB · Views: 237
  • 4C12BCED-59D3-4902-B290-CD1C3082BEF9.jpeg
    4C12BCED-59D3-4902-B290-CD1C3082BEF9.jpeg
    1.3 MB · Views: 244
  • 28D42BC3-B5B0-4A26-B51E-5A4D37417FD8.jpeg
    28D42BC3-B5B0-4A26-B51E-5A4D37417FD8.jpeg
    1.3 MB · Views: 237
  • 272B632F-FE8F-4740-9B97-EC3A15A00285.jpeg
    272B632F-FE8F-4740-9B97-EC3A15A00285.jpeg
    1.3 MB · Views: 235
  • 81A3F93D-5C8E-4B9F-9C06-20767549A0ED.jpeg
    81A3F93D-5C8E-4B9F-9C06-20767549A0ED.jpeg
    1.3 MB · Views: 228
Try put some clear silicone in the gap as a precaution then stick a skim stop bead up against your tile trim then skim back onto your wall
 
Id be inclined to cover that with some thing custom sized matching tile edging? Grip fill it on, silicone it on?
If you fill it then it will never be flat and crack unless you fill it, stop bead, scrim it and then skim that whole wall?
 
Looking at it its outside the shower cubicle so you could just bond it then skim up to it if ther is enough overhang from the tile bead
 
The besd would have been out of plumb so obviously they have put weedi boards on or whatever plumb an your left with this
 
Just scrim down edge then skim patch it in then run some silicone down wdge neatly as it will more than likely crack,talk about how many way can I string a cat or whatever the fooking saying is.thrrad closed
 
If you use expanding foam just make sure you don’t go mad with it or you’ll end up popping the tiles. Like Windy said it should of been sorted before it was tiled. Get the paper off and get the whole wall skimmed, use a thin-coat stop bead just before the tile bead. Will look better if you keep the profile of the tile bead.
 
Expanding foam then easi fill. Or just 2 applications of easifill to build it out if you don't have or want to buy foam. Frog tape the trim so it doesn't get scratched when sanding back. Why some of you make this more difficult than it needs to be is beyond me. A stop bead up the edge of that trim would look dog rough ‍for christs sake
 
Expanding foam then easi fill. Or just 2 applications of easifill to build it out if you don't have or want to buy foam. Frog tape the trim so it doesn't get scratched when sanding back. Why some of you make this more difficult than it needs to be is beyond me. A stop bead up the edge of that trim would look dog rough ‍for christs sake
Its easiest fix going
 
Expanding foam then easi fill. Or just 2 applications of easifill to build it out if you don't have or want to buy foam. Frog tape the trim so it doesn't get scratched when sanding back. Why some of you make this more difficult than it needs to be is beyond me. A stop bead up the edge of that trim would look dog rough ‍for christs sake
That will crack 100%
Should of been plastered before It was tiled
 
Should have been. But it wasn't. It wont 100% crack. I certainly wouldn't get a plasterer out to sort it.
Unless it’s someone who knows what they’re doing then of course it’s gonna need a spread. Tile over the f**k*r to get over it could be another option. You would be mistaken to think some easi-fill alone will sort that out, moisture in the room will have that over time, will open back up for sure.
 
Unless it’s someone who knows what they’re doing then of course it’s gonna need a spread. Tile over the f**k*r to get over it could be another option. You would be mistaken to think some easi-fill alone will sort that out, moisture in the room will have that over time, will open back up for sure.
You go tony,you go boy
 
Top