Groove37
Well-Known Member
To get it up??when your over seventy that's the time it can take lol
To get it up??when your over seventy that's the time it can take lol
its like a winter sun doesn't rise much and soon goes down lolTo get it up??
your only fcking jealousPrince Andrew , what a t**t , Clem rope by royal appointment
Lol , I'm too old for young girlies , my missus would have me hung .your only fcking jealous
Is there a difference Norm?read that wrong first time I thought u said in my wanking hours
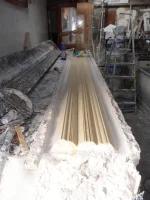
Just back from polishing my mould at the workshop and took a picture of my more typical running horses...Hello mate,
Nice bit of work, Christ your running horse is splendid work makes mine looki a right sack of s**t

Hello all,
I'm here to learn and hopefully share difficulties I encounter on my journey to discover more of the wonderful world of fibrous plaster. I've been very impressed with the discussions I read before my un-registered views ran out. I'm mostly interested in cornice work and have some, self-taught, experience of bench running. Recently I've been experimenting with reverse-moulds but have not yet mastered releasing product without damaging them and the mould!
I'm based in Coventry and find getting supplies difficult - no one seems to stock fine casting and delivery costs are huge. I mostly use dental plaster bought locally at Astley's Trade Centre, behind the Tile Hill Sainsbury's. Dental plaster is not my choice but is the only type I can get easily so, I would love to hear if anyone knows of suppliers in Coventry who stock casting plaster or if any locals want to collaborate and share a pallet delivery.
I'm also interested in lime plastering and everything to do with traditional building techniques (and some more recent trends using traditional materials such as hemp-plaster/hempcrete).
Looking forward to reading about your expertise and projects!
Dave
View attachment 41672
pass?Is there a difference Norm?
That makes me feel a little betterJust back from polishing my mould at the workshop and took a picture of my more typical running horses...
View attachment 41729
me to cant work it out cause that fancy horse to me looks like its sat on a fibrous mould that's come out of a reverse mould or a fibre glass oneThat makes me feel a little better
It does look a high quality finishme to cant work it out cause that fancy horse to me looks like its sat on a fibrous mould that's come out of a reverse mould or a fibre glass one
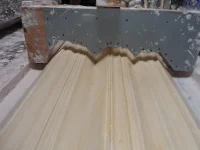
if u look at the left of photo that tells me its out of a mould not bench run and also the wing nut would be in way /something not right here but who am I to judge /I will help the guy if he wants but get the feeling things are not right someware also bench ect all to cleanIt does look a high quality finish
It certainly does look clean, the horse too, so am I right in assuming you think he took a squeeze then made the horse to fit the cornice?if u look at the left of photo that tells me its out of a mould not bench run and also the wing nut would be in way /something not right here but who am I to judge /I will help the guy if he wants but get the feeling things are not right someware also bench ect all to clean
something like that /you saw the photos of my workshop I think /compare itIt certainly does look clean, the horse too, so am I right in assuming you think he took a squeeze then made the horse to fit the cornice?
If only! I have yet to release a product from any of my attempts at reverse moulding without damaging them. The reason it's clean is because I took photos afterwards, having cleaned everything up (not yet proficient enough to faff around with a camera while plaster is setting). Yes, the finish is excellent but that's because of my profile rule - I make thick ones from steel, around 1mm thick which have almost no flex. The coped edge is sawn, filed, diamond filed, sanded and honed down to 400 grit until perfectly smooth and narrowed to almost sharp. That particular blade took the best part of an afternoon to make. The reason I went to that much trouble is because that run was intended to make a mould, in glass fibre (which I've since done but haven't yet used - still polishing it)me to cant work it out cause that fancy horse to me looks like its sat on a fibrous mould that's come out of a reverse mould or a fibre glass one
what is your problem you cant release them /sorry im scrutinising your work but been doing this stuff for nigh on 55 yearsIf only! I have yet to release a product from any of my attempts at reverse moulding without damaging them. The reason it's clean is because I took photos afterwards, having cleaned everything up (not yet proficient enough to faff around with a camera while plaster is setting). Yes, the finish is excellent but that's because of my profile rule - I make thick ones from steel, around 1mm thick which have almost no flex. The coped edge is sawn, filed, diamond filed, sanded and honed down to 400 grit until perfectly smooth and narrowed to almost sharp. That particular blade took the best part of an afternoon to make. The reason I went to that much trouble is because that run was intended to make a mould, in glass fibre (which I've since done but haven't yet used - still polishing it)
I'm flattered at the scrutiny and freely admit the finish on this one was better than my usual runs but the irony is that I have, so far, never made anything approaching a decent product from a mould!
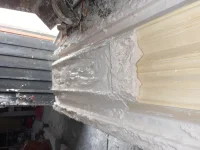
I just found a couple of photos that betray the order of things. This one is the same bench-run plaster pattern (after cleaning up!) showing the back of the cornice - which is deep and would (I think) need to have come out of a flexible mould had it been taken from a mould:if u look at the left of photo that tells me its out of a mould not bench run and also the wing nut would be in way /something not right here but who am I to judge /I will help the guy if he wants but get the feeling things are not right someware also bench ect all to clean


Don't be sorry, I really appreciate discussion.what is your problem you cant release them /sorry im scrutinising your work but been doing this stuff for nigh on 55 years
is the first photo made up of solid plasterI just found a couple of photos that betray the order of things. This one is the same bench-run plaster pattern (after cleaning up!) showing the back of the cornice - which is deep and would (I think) need to have come out of a flexible mould had it been taken from a mould:
View attachment 41752
This plaster pattern was used to make a fibre glass mould which has edges angled for ruling off (I added a clamp-on fence to extend the 'wall line' up the solid back pf the pattern to make this mould:
View attachment 41753
Had the cornice been cast in this mould, it wouldn't have the solid back (and if I had another mould, I wouldn't have made this one!)
That mould took me a couple of weeks to make (on top of a couple of weeks to dry the pattern) - shellac brush coats, sanding, shellac polish coats, 6 paste wax to dry before buffing, double gel coat with loose glass fibre in the second, two chopped strand mat laminations, a day grinding the edges, and releasing, wet sanding mould imperfections to 1000 grit and finally, today, paste wax polishing.
Having done one, never again, far too much work but all part of the learning process.
Oh and yes, I think that last picture also gives an feeling for the plaster mess in my workshop, despite my fastidious use of dust sheets!
Yes, that's solid plaster, no lath or scrim - it stayed on the shellac running bench while it was glass fibred and was obliterated getting it out of the fibre glass.is the first photo made up of solid plaster
when u shellac your reverse mould do this as the plaster heats up not when cold /I use half lard and cooking oil heated and mixed together to release the castDon't be sorry, I really appreciate discussion.
I've been trying to release from plaster reverse moulds. The moulds are 'green' and still damp rather than dried and shellaced. I only recently discovered this was possible, having seen Brazillian plasterers making corninces with back moulds in youtube. They use detergent as their release agent (on fresh plaster). I've tried every detergent I can find, several oils, vasaline, mixtures of oils and detergent but always find the product is stuck like s*it. The few that realease, pull bits of the mould out or leave bits of themselves on the mould.
I know I should probably dry the reverse mould, shellac and wax it but the wet moulds look too dam convenient to not investigate. I'll try and post a video of the technique.
Please, tell me how it's done!
when u shellac your reverse mould do this as the plaster heats up not when cold /I use half lard and cooking oil heated and mixed together to release the cast
if u lose any of shellac on a pull out simply re apply it to area then splash meths on it and light it job done
Thanks. The pale brown colour is the shellac put on immediately after running? Just a single coat? Sorry for all the questions but this is really helpful!her is a photo of a reverse mould note the thickness of it
Yes, that's solid plaster, no lath or scrim - it stayed on the shellac running bench while it was glass fibred and was obliterated getting it out of the fibre glass.
I couldn't post the youtube video but if links show up, this one shows the 'wet' technique I want to learn (plaster-off-plaster). At about 5:30 you see him sponge the plaster back mould and, using google translate, I found he used laundry detergent as his release agent. I so wish I could pop a product off like he does!
link:
yes but that is the clear shellac don't like it /not necessary the one coat I just paint it on till it starts to drag cuased by the heat then leave itThanks. The pale brown colour is the shellac put on immediately after running? Just a single coat? Sorry for all the questions but this is really helpful!
yes as the steam starts to riseThat's certainly something I've not tried, thanks! When you say while the (mould) plaster's warm, do you mean immediately after setting - so still damp? I didn't know shellac would take on damp plaster but that would be excellently fast and what I'm looking for. I've tried lard and oils but not mixed, again thanks. I won't get to my workshop til mid week but have some things to try now. Thanks very much!
Really useful, thanks. I would never have thought to put shellac on that early - I'm really pleased to have found this site.yes as the steam starts to rise
me to getting tired speak again palReally useful, thanks. I would never have thought to put shellac on that early - I'm really pleased to have found this site.
Time to sleep, thanks again.
I certainly did see them and very impressed I was toosomething like that /you saw the photos of my workshop I think /compare it
Following your advice Hobo, I made some progress today.me to getting tired speak again pal


let it heat up as it sets the heat will melt the releasing agent allowing for a easier stripout/also suggest u use a rubber grouter to clean off your spillage on the wings that scraper is stripping off the shellacFollowing your advice Hobo, I made some progress today.
I ran a small reverse mould in plaster, gave it one coat of shellac and used your suggested mix of lard and cooking oil as release agent. I did 1:1 and warmed it by putting the pot in boiling water until it mixed nicely. I used one brush coat.
I applied plaster, back ruled it and attempted to de-mould shortly after it set. It's by far the best result I've had so far but it did break in a couple of places. The mould was undamaged and only a couple of patches of shellac came off (on the ruling-off edges, caused by scratching rather than sticking). I then tried a second cast, after another brush coat of lard/oil and that was fine too.
The cracks I had happened when trying to get an edge free; once I got it beginning to separate it was fine. The question I would have is how long after set should I leave it before de-moulding (I did mine about five minutes after it was set), maybe longer would make it harder and less likely to break? This was a very small cornice (about 70mm across) and quite a simple design but it's definitely progress so thanks for sharing your methods
heard of polishing there hand rail but never a mouldJust back from polishing my mould at the workshop and took a picture of my more typical running horses...
View attachment 41729