
johniosaif
Private Member
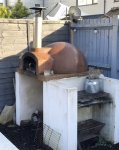
Got to render this oven , sp says , insulate ,rock wool/ loft wool , eml , then render with 4/1 sand cement, wondering if the heat will affect it Stage 14
Once the arch is set in place, lay your chosen tiles around the oven as shown in the diagram on the left, use suitable outdoor tile adhesive, it does not need to be heat resistant.
Next using a tile and concrete drill piece, drill holes to accommodate rawl plugs, every 150mm, then screw in eye screws
Stage 15
Once you have laid your tiles of choice loosely place your insulation material around the oven, you are using the in- sulation not only for insulation purposes but to generate a aesthetic shape. If you have been provided with a box of fibrefrax from The Stone Bake Oven Co, you may need to still add additional glass fibre insualtion to generate your chosen shape. Standard glass fibre loft insulation can be used.
Once you have loosely laid the insula- tion around the oven attach chicken wire to the hooks that you earlier drilled into, pull the chicken wire around and form your shape, you can pack insual- tion in if your shape is not even, once a satisfactory finish is achieved, tie your chicken wore with cable ties to hold in place.
Pull the chicken wire around the flue as shown in the diagram.
150mm approx.
Stage 16
Once your chicken wire is safley in place and your desired shaoe is achieved, attach the bottom of a piece of plasters lathe to the hooks earlier inserted, then, as shown on the leftm, with an angle grindermake incisions in the lathe, stopping around 150mm from the bottom of the lathe, this will aloow you to fold the lathe in on itself and mould to your shape.
Fold all the lathe in onto your chicken wire and apply with cable ties to hold in place. Do this untill all the lathe is supported. Apply the lathe to the top of the arch, so the render can be applied to the front face of the arch, as shown.
You are now ready to render.
Stage 17
Apply your render to the mesh, this render can be sand and cement, 4 parts plastering sand, 1 part cement, a glug of PVA.
With a trowel apply this to the mesh as shown, until the entire oven is covered. Wait for the render to be 90% set and then wipe it over with a damp sponge in order to work out the trowel lines.
Once the render has dried
Notes


 ....
....