wayne stevens
New Member
Hi we are a husband and wife team that want to learn and earn but using our garage as a practice session.
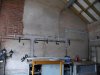
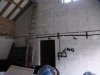
Garage is built with solid blocks with a cavity, gables are 5.3meters tall at the ridge and 3m at the eves and its 4m wide so a bit big for us in one go. we did a single coat in sections in a 3(buiding sand) 1 (cement) mix with some kingfisher mortar latex additive and all went well with no cracking and a hard finish, we then started to paint it but the surface is uneven so half way through painting we decided to one coat it again and practice our poly floating and darby skills.
Here is the fail... We again did a 3 (building sand) 1 (cement) mix with the additive only this time we pva'd the painted wall, (we did no scratches so wall was smooth), it was a dam good flat finish, BUT it started to crack after a few days and it was hollow in huge areas so we got a scraper and fetched it off, the only area that is still stuck solid with no cracks is where we didn't use pva.
We have read lots of advice since on mixes and scoring the existing coat with a grinder, so heres our plan....(please advise on wrong thinking)
We are going to cut scratches into the existing coat, then pressure wash it, then we will sbr it with a 1:1 (sbr:water), then while the sbr is tacky we will one coat render it with a 2:2:1:1 mix (sharp sand:building sand:cement:hydrated lime)
Does that sound reasonable?
If not we are in stoke on trent and are willing to labour for a good renderer in order to gain skills experience.
thanks Wayne and Tegan
")